Summary
A video assignment is much the same as a regular written assignment with just a couple of tweaks to make it easier to use. Here you’d set an assignment and rather than uploading the usual PDF assignment the student would submit a video they had created.
Resources
- Uploading Media to Echo360/Otago Capture (echo360.com)
Creating a Video Assignment
Create the assignment submission area as you usually would – instructions linked at the bottom of this page in the Related Pages area. The only changes to make are:
- Submission Types – just select Online text
- Feedback Types – turn off Annotate PDF, keep Feedback comments and select the others as required.
Another addition to this assignment would be some instructions for students so they know how to submit their videos.
Instructions for Student Submissions
- Log in to Moodle.
- Navigate to your course/module.
- Find your assignment and open it up.
- Click Add submission at the bottom of the page.
- In the Online text box you will see a blue circle icon with green triangle inside (Echo360 logo) – click this icon.
 A. If you don’t see this icon click your name in the top right hand corner of Moodle.
B. Click Preferences from the drop down menu.
C. Click Editor Preferences.
D. Select Default editor and click Save changes.
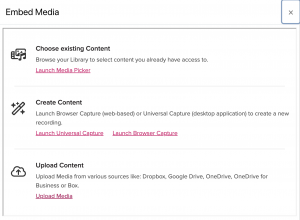
E. Go back to step 2. - You’ll see an Embed Media box pop up – from here you should Upload Content from your computer, or DropBox GoogleDrive or OneDrive which ends up in your Echo360 Library, this can take a while, so after you get a notification to say you have been successful you can then Choose existing Content from this Echo360 Library.

- Follow the on screen instructions and finally click Insert next to the video you wish to add to your assignment (this will share the video with your instructor)
- This will now add a link to the Online text box in Moodle – which will be how your video is viewed and graded.
- Click Save changes once you’re finished – you will see the status of your submission on the next screen. Note: Processing the video in Echo360 can take some time. If you grow impatient you can check that something is happening at Echo360.net.au (use your university email and password).
- A good idea is to use software called handbrake (https://handbrake.fr) to downsize your videos so they take less time to upload.
*Note:
- Video files can be very large- make sure you upload the files using a laptop/computer with good internet connection.
- If your file upload was successful but the submission was not, you don’t need to upload the file again. Follow the Steps 1-5, and you should be able to see your video files in Echo360 plugin. Choose the file and click ‘insert’ to embed the file, then complete the submission process.
Related Pages

