
Summary
Blackboard gives you the ability to set up study groups within your paper. A group consists of one or more users and can have access to:
- Group Discussion Board
- Group File Exchange
- Group Email.
- Group Assignments
- Group Tasks
This could be useful if your paper had two groups of students (e.g. Physical or Human Geographers) or if you wished to use Blackboard to facilitate group projects.
Resources
- Groups (help.blackboard.com)
- Getting Started with Groups (pdf)
- Creating a Group (video)
- Creating Group Sets (video)
Creating a Group
Groups are easy to create – find the Users and Groups section in the Control Panel and select Groups. Here you will see a list of all the existing and two buttons which will allow you to create more. You have the choice of Create Single Group or Create Group Set; the difference being the number of groups created. With a single group you can either have self-enrolment (students choose to be part of the group) or manual enrolment where you place the students into the group. Group sets offer another option – random enrolment. Random enrolment allows you to pick the number of students in a group, or the number of groups you want and Blackboard will randomly assign students to a group.
Student Created Groups
When you are in the Groups section of the Control Panel you will see the Group Settings button – this allows you to choose if students can create their own groups. Students may want to set up study groups and have an area on Blackboard where they can organise this and store resources.
Bulk assigning students to groups
You will need to create all the groups you want to add students to first, even if the groups are created empty, and make sure all of those students are enrolled in the Blackboard paper.
From here you can:
- Go to the Groups page on the Blackboard paper
- Click on Export in the top right corner of the page
- Choose to export Groups and Group Members
- Select the option Include Header Row
- Click Submit
This will give you an email with a link to a zip file. Inside the zip file will be a csv file called some like 20170216091542_DEMO012_groupmembers.csv This is the date and time downloaded, the papercode and the group members. This file should contain:
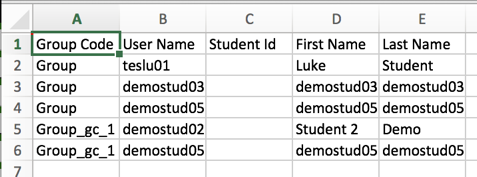
Example of the Group csv
Here there are two groups, one called Group and another called Group_gc_1 The second column lists the usernames associated with each group. These are the only two columns you really need, so you can just delete the others.
- To add students you just need to add the name of the Group in the Group Code column and the username in the User Name column
- Note the Group Code column doesn’t always match up with the name of the group in this option, for example Group_gc_1 is really called Group 1 in my testing paper but for importing an exporting groups Blackboard created the code Group_gc_1 because it doesn’t like spaces in Group names
- Now save the csv file, don’t rename it.
- Go back to the Groups page on the Blackboard paper and Click on Import which is to the left of the Export button
- Using the Import Group Members option browse to the file and upload it.
- Don’t worry about doing anything on the Import Groups option
- Select Submit You’ll receive an email when the import is done.
How to turn the Groups tool on/off:
If you have tried to use Groups tool and found it missing, or received a ‘privileges’ error message , you may need to make the tool available again by following these instructions:
- Go to Control Panel > Customisation > Tool Availability
- Find the Groups in the list and check its ‘availability status’.
